Unhinged – Part 2
I'd bet if you polled anyone over on the forum at Stovebolt.com (a virtual garage of sorts for fans of old Chevy trucks) about the most challenging or frustrating area to work on these AD or 'Advanced Design' (1947-1955) Chevy trucks, it would be: Doors. At least they would be right up there on the list. They have an entire sub-forum dedicated just to doors. It seems getting them to fit the opening, open and close properly, latch, lock, seal from the elements, with windows that roll up and down is an art - with some science and voodoo magic thrown in. We're tackling the first item in that list.
The concensus on hinges? Rebuild the factory originals. Reproduction hinges are junk.
When the painted truck came to us the empty door shells were bolted to the cab. One of the first things noticed when opening the doors is that the leading edge of each rubbed on the cowl. The 'fresh' paint was scuffed and already chipped off the inside edge of the doors.
The passenger door was ‘tight’ with very little gap around the opening. (We later found evidence suggesting it wasn't original to the cab. Yes, donor doors can actually be a different size or shape). The upper hinge bolt heads interfered with the door, preventing it from closing all the way. The door was not flush with the cowl and needed to come out more but the hinges were maxed out on their 'adjustment'. And, these hinges were not original. They were aftermarket reproductions. Could they be that bad? Let's find out.
Aftermarket Hinges Unnecessarily Hogged!
I started pulling bolts that hold the hinges to the cab. What did I find under those large flat washers? Gaping holes way beyond any amount of vertical or horizontal movement possible. Someone had gone crazy with a die grinder. Bolt holes were hogged in every direction. The edges of the face plate, ground off in places. Even the sheet metal edge of the hinge pocket was trimmed away. The bolt heads were already crushing the washers into the void. I found the driver side hinges were also hogged out but not nearly as bad.

We could have spent the time welding up the holes but at this point we had no real reference for their size, shape, and location. So rather than try and repair this side I decided to order another set with hopes they might be better in other ways. I chose Dynacorn out of CA, a company we were familiar with. But like everything else, their reproduction parts are made overseas.
Differences, Pro, Cons
When they arrived I found obvious visual differences between the generic repop hinges, that I think are sold by most vendors, and the ones made by Dynacorn (#1101C).

The Dynacorn hinges appear more ‘finished’. The strap that goes into the door is slightly thicker and the rest of the hinge arm is ‘beefier’. The hinges pivot freely on their pins but not sloppily. The tin face plates are spot welded to the body of the hinges squarely.
The Generic hinges had tighter pins. Being slightly thinner material they would probably be easier to bend in a vise without heat.
The real test was whether the new hinges would bolt on and work without modifications. Was the bend and geometry of the hinge strap (arm) better or worse?
The Results
I bolted the new hinges to the pillar (in the fully up position), grabbed a door, and attempted to slide it onto the hinges. It refused to go on without a fight. Fail! What was going on?
Well, for starters it turns out the hinge pockets in the doors were slightly deformed and crushed from tightening the bolts on the old, thinner hinges. A little prying and bending with a large, flat screwdriver on sheet metal fixed that.
But another test fit of the door proved it did not want to slide on both hinges at the same time. It would start on one or the other but not both.
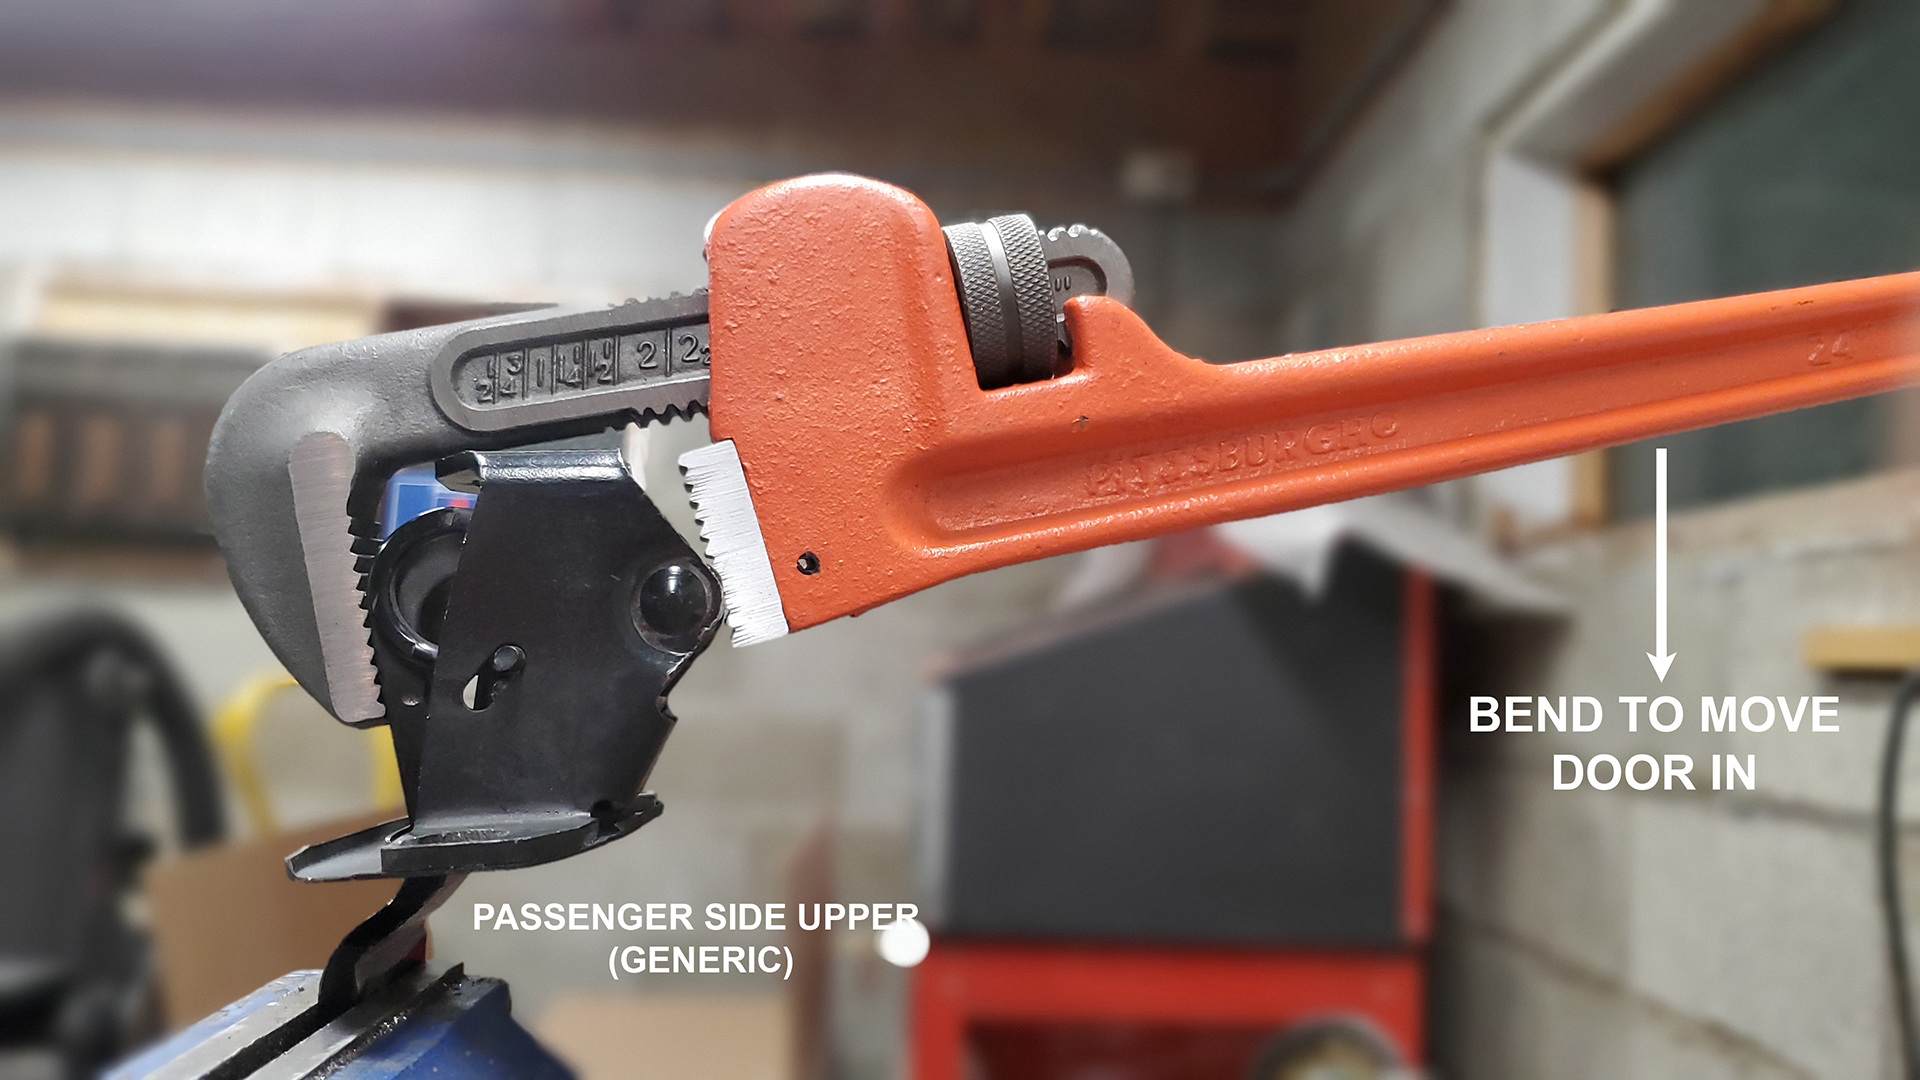
The doors are curved from top to bottom. The curve inside is fairly dramatic. Both hinge straps are angled or twisted to match that curvature. Comparing the twist angle of the old hinge with the new one showed the lower Dynacorn hinge was twisted too far.

With the lower hinge clamped in a vise I heated the strap cherry red with an oxy/acetylene torch right at the first bend and twisted it back. With a digital angle finder on the body of the hinge bracket we can measure the angle relative to the strap (ie: pin to strap). 13.5° give or take a few tenths seemed to be about right.
And with the hinge bolted back onto the cab, the door slid on both hinges just fine. A 'strike' goes to Dynacorn on this one.

Adjustments - Let the Fun Begin
With the door back on the new hinges and loosely closed I found it was too far in at the top and stuck out at the bottom. Disappointing but not too surprising. Someone had already fought this battle and lost.
Out of all door adjustments designed by GM into this hinge system, the 'door panel to cowl panel' (whether the door is flush with the cowl or not) is the trickiest and requires the most work.
The factory service manual only mentions bending the hinges to make this particular adjustment.
Are you old enough to remember film strips and projectors in class rooms back in the old days? I am. Brad Allen has posted frames from a vintage GM service training film strip called Servicing Chevrolet Truck Cabs that is a great reference for all things related to door adjustment. Frame #24 mentions "enlarging body hinge bolt holes or bending hinges".


Personally, I think the hinge holes at the cowl can and should be left alone. They’re only slotted for vertical movement and any horizontal adjustment needed can be made by bending the strap. It’s just a little bit more work. What neither the manual or film strip tells you is where to bend, which direction, and how much. There are no suggestions on how to bend them.
After some careful thought and study it was time to try some bending. I'll explain later how and why bending works the way it does. But the bottom line is: Bend the hinge strap in the opposite direction you need to move the door. Bend in to move the door out, and bend out to move the door in.

I'd suggest bending hinges only while off the truck. Using too much force while on the truck will likely bend the pillar and hinge pockets out of shape. And heat from a torch can damage surrounding paint, if that's a concern.
I've read talk about clamping the hinge in a vise and bending it with a pipe wrench. I tested the method with an old hinge with success - probably because the material is thinner.

It was much harder to bend the Dynacorn hinge that way so I turned to heating it dull red with an oxy/acetylene torch. Once heated I grabbed the pin area with a large adjustable wrench and tweaked it easily. This would be my preferred method for all bends and all hinges.


You need a reference point to measure the amount of bend. It doesn't take much of a bend - probably less than 1/4" and maybe only 1/16" to 1/8". It will depend on the hinges used and your truck.
Measure the hinge before you heat and bend it. Clamp the strap in a vise and place a straight edge along the top edge of each hinge strap over to where the big reverse bend disappears into the hinge body. You can just eyeball the gap (if any) and judge how far to open or close it. Now, heat the hinge with a torch to dull red, give it a little bend with your wrench, and then grab your straight edge to check the change. (Don't burn yourself. You're wearing gloves, right?) If you went too far, quickly bend it back the other way and recheck.

Once it cools down enough to handle you can bolt the hinges (all the way up in the slots and tight) to the cab and test fit the door. Leave the bolts loose on the door so you can move it around and very carefully close it.
Important reminder: A small adjustment at the hinge can translate to a large change at the other end of the door. If the striker is in place, remove it. We haven't even gotten to latch and striker installation yet.
Lift the door up so that the belt line of the cab and door line up. Is the door flush with the cowl (or up to 1/16" proud)? Are you able to line the door edge up flush with the cab at the back or does it stick out at the bottom?
A door that's a tiny bit too far in at the top can make the bottom rear corner stick out. You'll get the opposite effect (diagonally) if the bottom of the door is in a tiny bit too much. The goal should be to have it flush with the body front and rear and that's achievable if the hinges are bent the right amount and the door isn't physically twisted out of shape. If you're not a glutton for punishment, then splitting the difference across some panel or gap is totally acceptable.
On this truck I ended up bending both Dynacorn hinge straps in till there was zero gap measured at our reference point with a straight edge. This made the leading edge of the door slightly proud at the cowl. We have tight gaps all around so this was warranted.
On the generic driver side hinges, I welded up the oversized bolt holes and used a die grinder with ¼” straight carbide burr to restore them to the original shape and size. External tooth star lock washers will be used under the bolt heads.
In bending these hinges I ended up with a 1/8" gap, as measured with a straight edge (using our method above) on the top hinge, and zero gap on the bottom hinge. It may take some more fine tuning but we should be very close.


How and Why bending These Hinges Works
Some of you may already know or figured out how bending the straps moves the door horizontally in or out of the opening. Sadly, it came to me while laying in bed at night thinking about it.
It has to do with pin location and geometry. Using the magic of Adobe Photoshop, here are two simulated images with exaggerated bends to illustrate. When the strap is bent and then swung back to where the 'closed' position would be (ie: parallel to the door), you can see the door is effectively repositioned. Notice, however, it will also tend to move the door forward or back slightly. Other adjustments can be used to compensate.
The actual bends you make will be much smaller and the amount of movement more subtle.


Fore, Aft, and Vertical Door Adjustment
These adjustments are covered in the service manual and film strip noted above and are pretty straightforward. I found there was plenty of fore and aft adjustment of the door on the lower hinge. There’s almost too much. But the upper hinge is much more limited.
If you need to move the door forward more than the upper hinge is allowing, there are a couple of things you can try - and slotting the holes in the strap may not be the answer!
It turns out that sheet metal inside the door will only allow the upper hinge strap to slide in so far. With the door on a stand, take note of where strap stops when you slide it into the door. There's a stop that contacts the back side of the hinge arm. Some dimpling of the sheet metal here may help. You can also remove a little material from the back of the hinge arm where it contacts this stop.


The back of the pocket is also closed so the end of the strap may hit it. You can remove a little material from the end of the hinge strap. It may be necessary to slot all holes just a little towards the front.
Even with the hinges bolted to the pillars in the fully up position you may need more vertical movement out of the doors to get the belt lines to line up. If necessary you can slot all hinge strap holes vertically.
Removing just a little material here and there and checking the fit can net 1/16" to 1/8" or more of valuable adjustment for good alignment and even gaps.
There's no need to get carried away or run amok with a die grinder.

Final Tip
There's a lot of trial and error testing involved. Run a 3/8"-24 (fine thread) tap through all holes at the beginning. It'll clean the threads of paint and corrosion and make running bolts in by hand faster and easier.

Paint was chipped off each door on the inside edge right down to the primer. It was touched up for appearance and protection.


My conclusion on reproduction hinges? All will need some work for fit and function. But it's doable. Rebuilding originals are best for time and cost. Still, there's no doubt there was some guy on the assembly line back in the day who's job was to bend and tweak things for an 'acceptable' fit.
Next stop: Door latches, strikers, and weatherstrips. What could possibly go wrong?